Menu toggle

Undertray fixings

BoxsterLL11

PCGB Member
Member
I am giving my Boxster a good going over while its fully up on axle stands and doing its 12 year service.
I have removed all the undertrays to give them a clean and remove the multitude of stones and gravel they have been collecting.
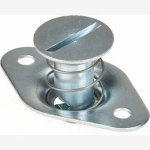
Unfortunately, three of the plastic nuts which is one type of tray fixing has sheared off their threaded studs that are fixed to the underside of the body.
I have oodles of plastic fixings etc in my stock but as yet cannot find a way of reinstating a fixing to replace the sheared stud and plastic nut.
Obviously I will have to remove the remnants of the sheared stud from the underside of the body.
I just wondered if any other owner has experienced this and how they managed a fix.
 
This is a common problem with these nuts and studs. Some places just trim off the remains of the stud and drill a hole for a self tapping screw. I prefer to use rivet nuts, e.g. https://www.amazon.co.uk/dp/B0B57D1Y74?th=1 with M6x20 stainless steel screws e.g. https://www.amazon.co.uk/Stainless-Flanged-Button-Screws-Socket/dp/B0BK1X9X2P. You could use shorter screws, but I use the old plastic nut to make a large washer/spacer by cutting off the hex part of the nut and running an M6 tap through the remaining 'washer' then threading it onto the screw. I think this is better than using large 'penny' washers.
Note, you don't need a special tool to instal rivet nuts. Use an M6 screw with a large nut as a spacer (or drill out a smaller nut to 6.5mm). Add an M6 washer between the spacer nut and the M6 screw head. Press the assembly into the drilled hole (it should not be a loose fit). Use a spanner on the spacer nut to stop it, and the rivet nut, rotating and tighten the M6 screw. You will feel the rivet body expanding, keep turning the screw until it is solid. Practice on an old piece of sheet metal to check that a) the screw is long enough to fully engage into the rivet nut (if not get a longer screw) and b) to get a feel for the force required to collapse the rivet.
 
Thanks Ian.
I have plenty of A2 M6 screws in my stock to be able to use.
Wasn't sure about drilling the floor pan for not knowing what is the other side.
Worth a go for ÂŁ4.99 for 20 and free delivery.
3 sheared on different trays so not the end of the world if nothing is refitted but I prefer to fix it when its not right.

Also had one of the torx screws seized solid by the offside front wheel.
Sheared the tips of three torx bits trying to remove it, ended up grinding the head off then chisel the threaded section of the torx screw and the speed nut clip off the aluminium suspension sub-frame.
The screw wasn't seized in the speed nut but in the alloy sub-frame flange.

And got a dust pan full of small stones sitting on the top of the front tray !!!
 
Last edited:
OK
My rivnuts arrived today ...........
I had drilled pilot holes in the floor pan where the three aluminium studs had sheared off having ground them flush.
Unfortunately, the studs that have sheared on the two side undertrays seem to be directly beneath the outer front mounting for the seat runners so have drilled a 3mm pilot hole, very carefully, there seems to be no clearance behind the floor pan.
The other one, one of the rear ones for the front undertray, was positioned between the brake pedal and the left foot rest, perhaps 25-50mm back from them.
Where I had to drill into seems to be a void space and nearby was a rubber grommet drain.
I then drilled an 8.5mm diameter hole for the rivnut and through that hole I could just see into the void space and the drain tube going to the grommet.
So confident there was the space to fit the rivet I then commenced to collapse the rivnut in place.
Not quite so easy.

Now I am a mechanical engineer of 40 years experience (now retired thank god) and understand the mechanics of getting the rivnut to collapse.
In practice it aint so easy.
The way I did it was to fit long M6 screw into the rivnut.
Up against the rivnut face, I fitted a washer and an M6 nut.
I found the only way to collapse the rivnut was to hold and prevent the M6 screw from rotating and then wind in (tighten) the M6 nut up against the rivnut face which then pulled the M6 screw out and collapsing the rivnut in the process.
Quite a bit of force was need to get it to collapse and then clamp onto the aluminium floor pan.

I now have to decide what to do about the other two beneath the seats as there definitely is not sufficient clearance above the floorpan to push the rivnuts through.

And this is fun !!!!

I used the first method on this video.
I think by your description Ian, the method you used was the second one.

 
Hi Keith,
Sorry you are having problems with the rivet nuts. When I first read your post, there was no signature display showing your model. Since this has been added, I see that your car is a 981 (I should have realised since the problem happened at your 12 year service), so there will be differences in the layout of the mounting pins compared to my 987. I had no problems fitting any of the nuts (six in total) but I don't recall the exact positions.
Alternative approaches could be a) weld a threaded stud to a piece of sheet metal and bond this to the floor with a high strength adhesive or b) remove the seats and carpets and weld directly to the floor.
 
I do have a "plan B" like you first suggestion.
I found 2 M6 stainless countesunk screws last night.
Also some large M6 penny washers and countersunk the M6 hole so the screw head fits flush.
I then drilled 4 holes around the penny washers and glued the screws into the penny washers using 2 pack adhesive, this is just to keep the screws perpendicular to the penny washer.
Then I will use fibreglass resin and matting to bond it to the underside of the floor pan.
The holes I drilled in the penny washer should help the resin keep the washer in place and I'll also get some resin to go aroung the base of the thread and the resin should also fill the cross-head in the countersink head and prevent that from rotating.
I do have a welder but don't fancy pully both seats out and I don't have the skill to weld to aluminium, not with a MIG.
I'll let you know how successful or not this is.
 
Sounds like a good solution. I actually tried bonding large flanged button head screws as a first attempt. Ground the head flat before bonding. One let go on assembly because of being slightly out of position, leading to high side load as the nut was tightened. Two years on, I found three more had let go. Penny washer idea and bonded fibreglass matting would probably have avoided these later failures.
When refitting on the remaining factory studs, use new plastic nuts and anti seize paste.
 
I have been using copperslip anti-seize paste for 45 years, ever since I first went to sea.
Use it where ever I can.
Have already put a few trays back and put it on the remaining aluminium studs.
If they used it when building the cars, and I fully understand why they don't, these things wouldn't shear off in the first place !!!
 
My big gripe about penny pinching in build is not specifying stainless steel nipples in the alloy calipers (bought in from Brembo). Two stripped out threads and one sheared at the third fluid change at 7 years. Calipers repaired with Timesert inserts and all eight nipples replaced with stainless items. Equally bad are the steel studs and nuts they use on exhaust flanges which corrode away in about 5 years. Replaced with stainless (A4) about 8 years ago, still like new, will probably outlive the rest of the exhaust.
 
Been there, done that ....
First brake fluid change I did, I sheared off the inner bleed nipple on the nearside rear caliper.
I think the captive bleed nipple caps don't help as they trap & retain water at the top of the exposed thread on the nipple.
I suspect the inner nipples are never used at the time of servicing by Porsche.
I didn't even bother to try the inner nipples after that.
And I replaced the outer bleed nipples in stainless stright away, at very little cost.
And not long after buying my 981 I heard of horror stories of corroded exhaust flange mild steel bolts.
Fortunately, mine had been replaced at the previous Porsche service beforee I bought the car, with mild steel ones.
So I replaced them with stainless.
I also found a few of the back box exhaust clamps so badly corroded, well the bolts and captive nuts, that I had to cut the clamps off to replace them.
I then fitted Mikalor high grade stainless ones.

I know some owners might poo-poo these sort of minor mods as its not keeping the car original as Porsche designed it, but as I service and maintain my car myself, anything that makes servicing and maintaining it easier is worth the few extra pennies.
 
Success ......

Here is the process I used

Countersink one side of the penny washer so the countersink M6 screw head sits almost flush with the back surface of the washer.
I then drilled 4 holes around the periphery of the washer so that fibreglass resin can flow through the holes improving adhesion in place.
I then used a 2 pack epoxy glue to set the M6 screws in position to the washers ensuring the were perpendicular to the washer.
Once set, I then placed a few very small pieces of 3M double sided adhesive tape on the back of the washers.
This was to hold the washers/screws in exactly the correct position while I applied the fibreglass resin.
I had drilled pilot holes for fitting rivnuts, so I used these holes as a guide by centreing a spare penny washer over the hole and drawing around it so I could correctly position the penny washers/screws.
I rubbed down an area of about 60mm x 80mm centred on the pilot hole to remove the floor pan paint and then cleaned the area with thinners.
I put some plastic tubing over the M6 threads as I didn't want any resin getting on the threads.
I then mixed up a small amount of fibreglass resin, applied it to the backs of the washer making sure there was plenty of resin in the crosshead drive of the M6 screw.
And then pressed the washers into position, the double sided tape hold them in position.
The tape, although quite thin, was compressible, so just as the resin was about to go off, I gently pressed the washers up against the underside of the floor pan which helped to push some of the excess resin into the holes in the washer I had drilled.
Once set, and the M6 bolts seemed quite rigid in place with just this, I then cut some fibreglass matting to cover the area and punched a hole in the middle to go over the screw.
I put these in position, held in place at the corners with some small pieces of masking tape, then mixed up some more resin and brushed it over the matting to ensure the whole are was covered. A bit messy as trying to apply fibreglass resin upside down is not that easy.
I was going to clean the are up but its all behind the undertray any way and not visible so I left it as it was.
I then used an M6 stainless nut and washer when fitting the undertrays.
I didn't want to overtighten the nut for fear breaking the bond between the screw head and washer/floorpan so to act as a "lock nut", I fitted a small piece of plastic tubing tightly over the exposed threads to hold the nut in place just in case it loosened in time.
A bit belt-n-braces but am afraid thats the way I am.
I have some pics which I'll post up once I'm sorted.
 
Seems like an awful lot of work to just hold a panel together with an exposed thread too.
Why not use something like a Dzus fastener and receptacle? There are several different types including the one below.
Regards,

Clive
 

Attachments

  • Dzus Fastener.jpg
    Dzus Fastener.jpg
    13.5 KB · Views: 1
Yes, it was a bit of a faff.
The threads aren't exposed as I have covered the exposed threads with a small piece of plastic tubing.
And the threads/nut/washer are all stainless so will not corroded.
And the threads on the OE plastic nuts as fitted by Porsche are also exposed.
And even fitting the Dzus fasteners need a clearance to pop rivet or screw inro place and for the two sheared off studs that were directly beneath the seat mounting points I did not have clearance on the upper side of the floor pan so needed to fit something in the fashion that I did.
 

Posts made and opinions expressed are those of the individual forum members

Use of the Forum is subject to the Terms and Conditions

Disclaimer

The opinions expressed on this site are not necessarily those of the Club, who shall have no liability in respect of them or the accuracy of the content. The Club assumes no responsibility for any effects arising from errors or omissions.

Porsche Club Great Britain gives no warranties, guarantees or assurances and makes no representations or recommendations regarding any goods or services advertised on this site. It is the responsibility of visitors to satisfy themselves that goods and/or services supplied by any advertiser are bona fide and in no instance can the Porsche Club Great Britain be held responsible.

When responding to advertisements please ensure that you satisfy yourself of any applicable call charges on numbers not prefixed by usual "landline" STD Codes. Information can be obtained from the operator or the white pages. Before giving out ANY information regarding cars, or any other items for sale, please satisfy yourself that any potential purchaser is bona fide.

Directors of the Board of Porsche Club GB, Club Office Staff, Register Secretaries and Regional Organisers are often requested by Club members to provide information on matters connected with their cars and other matters referred to in the Club Rules. Such information, advice and assistance provided by such persons is given in good faith and is based on the personal experience and knowledge of the individual concerned.

Neither Porsche Club GB, nor any of the aforementioned, shall be under any liability in respect of any such information, advice or assistance given to members. Members are advised to consult qualified specialists for information, advice and assistance on matters connected with their cars at all times.

Back
Top