Menu toggle

Rust repairs

Kongsodoken

Member
I’m repairing the area behind the rear wheels - the channel that seems to catch all the stones crud and rusts like crazy -
anyone got any ideas to future proof it

Ive cut all the rust out and made new panels but debating

1. drilling hole to allow water out
2. Filling with seam sealer so there is no channel
3. folding the flange down and removing the channel
4 leave as it is it’s lasted 30 years

any ideas
 
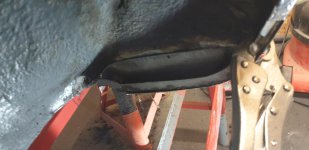
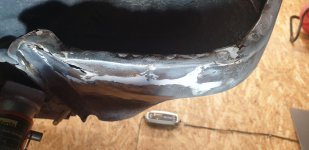
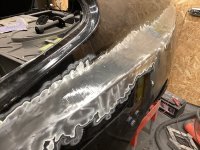
How bad is it, my passengers side had failed here, there was little of the lip left. I was thinking of getting a new lip fabricated until the old bodyshop that replaced the area in front of the wheels informed me that they still had the rest of the rear qtr that I had bought new from Porsche more than 15 years ago, lucky me. You can see some pictures of this section now stitched onto the car on page 29 of my thread.
Looking at your suggestions, I don't think drilling a hole is a good idea as this lip is where the qtr is welded to the inner section. Having said that, a hole with a small steel tube welded into it might work but you need to be sure that its a good weld with no chance of water seeping through the weld into the battery housing area.
Don't think you'll be happy in filling the channel, plus it would be noticeable if ever selling.
Same goes for folding the lip, easily spotted.
Leaving it really depends on my first question, how bad is it?

If not too bad, an alternative could be to clean the area up, use something like POR15 ( available from Frost Restorations) to kill the rust and give a solid ceramic based coating. I used this on my inner sill when my son welded in a new section without removing the outer sill.
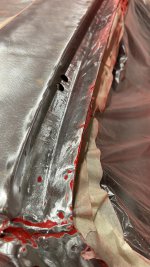
In the same series of photos in my thread, you can see this section when they removed the outer sill for replacement this time around. Note that it's not welded at the front end as all the welding was done from underneath, my point is that the metal still looks as good as when fitted 7 years ago, the sill itself still looks fairly good too and I had be told they could patch up the tiny hole but I played safe and chose a new sill.

Pete
 
It’s not that Bad but I have cut out all the rust and fabricated a new lip and outer panel
so I don’t have a rust issue now but was trying to think of a belt and braces approach
to stop water and crud getting in there in the first place, just being overly cautious maybe as it’s taken me 3 days to fabricate the panel
 
  • Like
Reactions: PSH
Mine have been previously patched right behind the rear wheel with a metal patch. Whoever did the job forgot to add the drain holes back in so I did that during the restoration project. There should be two 10mm holes in the front of the rear cubby, either side of the seam.

Or are you referring to the lower rear diffuser? I know a lot of crud gets stuck in between that and the channel in the body.

Also if you drill those holes do it from the outside, in. The first one I drilled I did from the inside and then kicked myself as it chipped the paint on the outside. Second hole was fine as I did it from the outside (y)

 
That looks pretty much how mine is - ive made same patch panel
i think I’ll keep it as is and just add plenty of corrosion protection

rust repairs are the worse- the wide body conversion is a doddle compared to doing these panels
 
It’s not that Bad but I have cut out all the rust and fabricated a new lip and outer panel
so I don’t have a rust issue now but was trying to think of a belt and braces approach
to stop water and crud getting in there in the first place, just being overly cautious maybe as it’s taken me 3 days to fabricate the panel
If you've already done the work its just a matter of what to seal it with. Read up on POR15, its what the professional restoration guys use, if not that, there are others out there.

Pete
 
This is the inner flange - just need to add the lip on the outer skin and weld in
 

Attachments

  • 20231224_134907.jpeg
    20231224_134907.jpeg
    152.7 KB · Views: 20
  • Like
Reactions: PSH
Would you believe that Classic Car Panels has just shown on FB a preview of a new 944 panel. Yep you guessed right, its the lower qtr rear panel...🙂
 
Would you believe that Classic Car Panels has just shown on FB a preview of a new 944 panel. Yep you guessed right, its the lower qtr rear panel...🙂
They told me they were making one - looks quite nice
- I have brought their lower wings but they are a long way out and I’ve had to do extensive mods to fit the sill ground effects mouldings, same with the rear part to the sill takes a lot of work to get the compound curves correct

this is their part from facebook post
 

Attachments

  • IMG_0903.png
    IMG_0903.png
    3.1 MB · Views: 13
Last edited:
You are doing an excellent job!

FYI I when I got all my metal work cleaned of rust I used several Bilt Hamber products. I treated any remaining rust and the bare metal with Deox-Gel which is like a citrus based rust converter in a wallpaper paste like gel. I then washed the repair and dried it. Followed up with some slow drying degreaser. I used their electrox zinc primer, some of the bits I also painted in epoxy resin paint. Final layer was some 3M stone chip paint. This was all underneath on the chassis side though. I guess you need a bit more finesse where it will be body coloured!
My rust seems localised so I’ve cut out the rust and put in new metal just debating what to use under the wings - don’t really want to remove all the factory undercoating as most of it is good
this was the new wing bottoms they don’t match the ground effect trims …
 

Attachments

  • IMG_0910.jpeg
    IMG_0910.jpeg
    1.9 MB · Views: 14
a Little update the previous owner had welded plates form the back and then filled.
Today I finished the outer skin - came out Ok for a difficult panel - fit is spot on
 

Attachments

  • 20231221_111718.jpeg
    20231221_111718.jpeg
    180.4 KB · Views: 25
  • IMG_0927.jpeg
    IMG_0927.jpeg
    1.4 MB · Views: 26
Is the first picture the panel above the rear bumper? If so mine also needed some work here, mine was some small holes on the corners both sides. The strange thing is that there was no hint of any corrosion here, I couldn't even see any when stripped to bare metal. I wonder what their procedure was to find what was just pinprick holes?

Looking good ...🙂

Pete
No it’s the area behind the rear wheel
I don’t seem to have the corrosion you had on that rear panel - these cars seem to hide the corrosion well , mine had no sign until I started removing the paint,
I’ve got another 3weeks of rust repair - the wide body work just about complete so looking forward to doing the body work and paint.

picture below is the wide rear wing added first coat of metal epoxy this stuff is expensive but fills all the weld pin holes - modern version of lead loading
 

Attachments

  • IMG_0937.jpeg
    IMG_0937.jpeg
    1.9 MB · Views: 15
picture below is the wide rear wing added first coat of metal epoxy this stuff is expensive but fills all the weld pin holes - modern version of lead loading

ahh...I see....I wonder if that's what my guys used, looked like lead loading but unlikely I thought in a modern bodyshop.
Two areas show evidence of some form of loading, an area near the passengers side hatch hinge and the other above the rear light, again passengers side. Theses show the areas concerned after being loaded.
 

Attachments

  • IMG-20231108-WA0015.jpg
    IMG-20231108-WA0015.jpg
    218 KB · Views: 10
  • IMG-20231108-WA0014.jpg
    IMG-20231108-WA0014.jpg
    402.2 KB · Views: 9
I have highlighted the area loaded above the light where the hatch seal sits, although the corrosion was light the shop advised to tackle it properly now rather than blow over it. I include the original to give a clearer view.
 

Attachments

  • 20240101_204156.jpg
    20240101_204156.jpg
    396.4 KB · Views: 13
  • IMG-20231108-WA0014.jpg
    IMG-20231108-WA0014.jpg
    402.2 KB · Views: 13
I had the channel filled where it is horizontal behind the rear wheel, then blended out the filler depth as the flange curved round to vertical. Once the whole inner arch was sprayed matt black with stone guard it looked unobtrusive. Its not standard, but I like to think what Porsche would have done with the benefit of hindsight in the original design.
 
I had the channel filled where it is horizontal behind the rear wheel, then blended out the filler depth as the flange curved round to vertical. Once the whole inner arch was sprayed matt black with stone guard it looked unobtrusive. Its not standard, but I like to think what Porsche would have done with the benefit of hindsight in the original design.
I'm thinking the same -it serves no purpose and just fills up with crud,
 

Posts made and opinions expressed are those of the individual forum members

Use of the Forum is subject to the Terms and Conditions

Disclaimer

The opinions expressed on this site are not necessarily those of the Club, who shall have no liability in respect of them or the accuracy of the content. The Club assumes no responsibility for any effects arising from errors or omissions.

Porsche Club Great Britain gives no warranties, guarantees or assurances and makes no representations or recommendations regarding any goods or services advertised on this site. It is the responsibility of visitors to satisfy themselves that goods and/or services supplied by any advertiser are bona fide and in no instance can the Porsche Club Great Britain be held responsible.

When responding to advertisements please ensure that you satisfy yourself of any applicable call charges on numbers not prefixed by usual "landline" STD Codes. Information can be obtained from the operator or the white pages. Before giving out ANY information regarding cars, or any other items for sale, please satisfy yourself that any potential purchaser is bona fide.

Directors of the Board of Porsche Club GB, Club Office Staff, Register Secretaries and Regional Organisers are often requested by Club members to provide information on matters connected with their cars and other matters referred to in the Club Rules. Such information, advice and assistance provided by such persons is given in good faith and is based on the personal experience and knowledge of the individual concerned.

Neither Porsche Club GB, nor any of the aforementioned, shall be under any liability in respect of any such information, advice or assistance given to members. Members are advised to consult qualified specialists for information, advice and assistance on matters connected with their cars at all times.

Back
Top