peanut
Active member
Heres a job that I've ignored since last summer.
I knew that the hatch pin locking area had started to rust and water was entering the hatch area. How I sure wish that I'd done the job then.[&o]
Its not as difficult as I first thought and the temporary repair I carried out took less than an hour and should stop the leak and arrest the rust until the better weather in the spring when I can do the job properly and touch up the paintwork.
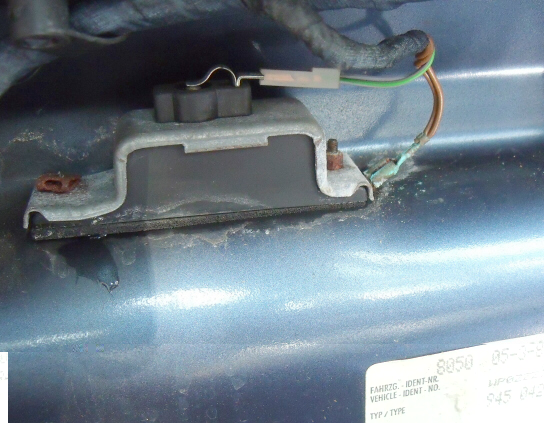
First I prised the rubber gasket block out with a screwdriver. (I intend to renew this when I do a permanent repair). You can clearly see where the water has got passed the rubber block and rusted the plate holding the 2x fixing screws. Before removing the lock assembly I would recommend that you mark the position of the steel fixing plate beneath the rubber block. Once you loosen the fixing nuts you may lose your pin lock alignment position which may prevent your hatch pin releasing cleanly after reassembly.
I then removed the 2x 10mm nuts holding the hatch pin locking mechanism under the rear slam panel. You'll need to pull off the drain tube and carefully prise apart the ball and socket joint that attaches the lock actuating arm to the pin lock assembly before you can pull it off the 2x fixing bolts.
I cleaned all the hatch pin lock parts thoroughly and regreased the pin lock slides. Next I removed all the rust around the hatch pin lock hole in the rear slam panel and the fixing bolt plate and treated both areas with a rust cure . I applied grease to the fixing plate to help prevent further rusting and reassembled the hatch pin locking mechanism.
WARNING don't forget, as I nearly did, to re-attach the lock actuating arm to the pin lock mechanism or you will not be able to open the hatch without climbing through the car to the rear to release the pin lock by hand .
last job was to lightly grease the rubber gasket block and reinsert it to the hatch lock pin receptacle. Its damned fiddly .!
When tightening up the 2x fixing nuts try to align the bolt fixing plate with its previous position, unless the hatch pin had releasing problems ,when you will need to relign the fixing plate and pin lock assembly before fully tightening the 2x 10mm fixing nuts.
Last image shows the top of the rear valance where water is collecting and pouring into the hatch pin lock receptacle .You can see where the previous owner has run a sealant mastic inside the channel section of the rear hatch rubber seal strip to prevent water ingress. I may have to renew this


I knew that the hatch pin locking area had started to rust and water was entering the hatch area. How I sure wish that I'd done the job then.[&o]
Its not as difficult as I first thought and the temporary repair I carried out took less than an hour and should stop the leak and arrest the rust until the better weather in the spring when I can do the job properly and touch up the paintwork.
First I prised the rubber gasket block out with a screwdriver. (I intend to renew this when I do a permanent repair). You can clearly see where the water has got passed the rubber block and rusted the plate holding the 2x fixing screws. Before removing the lock assembly I would recommend that you mark the position of the steel fixing plate beneath the rubber block. Once you loosen the fixing nuts you may lose your pin lock alignment position which may prevent your hatch pin releasing cleanly after reassembly.
I then removed the 2x 10mm nuts holding the hatch pin locking mechanism under the rear slam panel. You'll need to pull off the drain tube and carefully prise apart the ball and socket joint that attaches the lock actuating arm to the pin lock assembly before you can pull it off the 2x fixing bolts.
I cleaned all the hatch pin lock parts thoroughly and regreased the pin lock slides. Next I removed all the rust around the hatch pin lock hole in the rear slam panel and the fixing bolt plate and treated both areas with a rust cure . I applied grease to the fixing plate to help prevent further rusting and reassembled the hatch pin locking mechanism.
WARNING don't forget, as I nearly did, to re-attach the lock actuating arm to the pin lock mechanism or you will not be able to open the hatch without climbing through the car to the rear to release the pin lock by hand .
last job was to lightly grease the rubber gasket block and reinsert it to the hatch lock pin receptacle. Its damned fiddly .!
When tightening up the 2x fixing nuts try to align the bolt fixing plate with its previous position, unless the hatch pin had releasing problems ,when you will need to relign the fixing plate and pin lock assembly before fully tightening the 2x 10mm fixing nuts.
Last image shows the top of the rear valance where water is collecting and pouring into the hatch pin lock receptacle .You can see where the previous owner has run a sealant mastic inside the channel section of the rear hatch rubber seal strip to prevent water ingress. I may have to renew this