Menu toggle

Diary of a 997

usermjg

PCGB Member
Member
Hi, I thought I would start my diary of my 997- I started a diary of my 924 some time ago, then my 911 however they have moved onto new owners, so 997 it is :)

<a data-flickr-embed=
49832367908_12b2de64f7_z.jpg
" />
Decided that the fog lights needed a little deep clean :) Thought about the change to LEDs, but I on reflection don't really think they suit the car.
<a data-flickr-embed=
49832367898_029e937f8a_z.jpg
" />
After wet and drying then polishing and a final seal applied, not a massive job but will make a difference to the face of the car :). Also decided to look at the front intakes, don't really like the idea of leafs/ stones road grit getting into the front rads, so I purchased some mesh and cut to shape then carefully rip tided to the centre spar.
<a data-flickr-embed=
49832367903_5f3fe7716f_z.jpg
" />

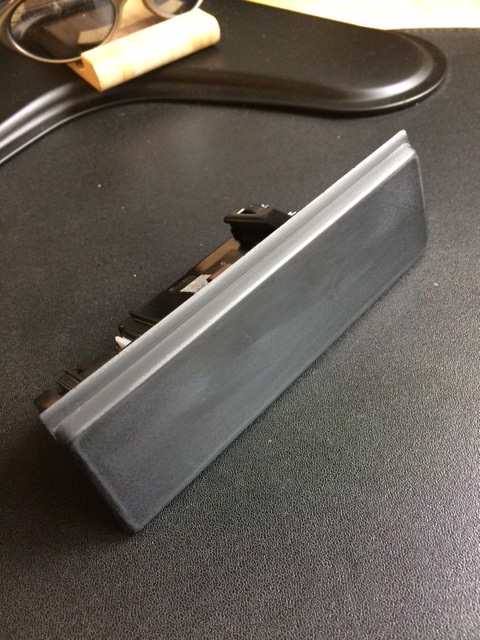
Next job, My ashtray isn't working, broken mech on the lid, and scratched so need to colour match the interior and sort that out :)

Marc


Nice! Like the clean-up on the fogs. I did a similar job, albeit without the need for wet and dry, on my headlights a couple of years ago and they came up a treat. The fog assembly does look very tired though, so that will be a job for the list.
I did exactly the same with mesh too. It was fairly easy to make up a template from which to cut mesh to size then fix behind the intake. Yours looks just a neat a job as mine :)

Look forward to more coming along!

 
Did mine also and I'm the same I like the original look. Just took my back lights out as well which is easy and gave a good clean. Also took the airbox out and tidied up the engine a bit as it gives loads more room.
 
Purchase a second hand ashtray / as mine was broken:(
<a data-flickr-embed=
49850239527_0360875ea0_z.jpg
" />
Wet and dried the top using 1000 grit to remove and clean the surface.
<a data-flickr-embed=
49850239537_a0715fd02b_z.jpg
" />
Then re-coloured :)- However I have got the colour match wrong for my interior, I really thought it was Metropol Blue- It isn't:(
<a data-flickr-embed=
49849397043_af9a6dd8a1_z.jpg
" />


<a data-flickr-embed=
49854008603_0e55702cd0_z.jpg
" />

Thought I would carry out a quick job/ change the "Frunk" and "Engine" compartment Light, Decided to go for LED, less power and I think a brighter, cleaner light :)
<a data-flickr-embed=
49854008618_56cc86b558_z.jpg
" />
It took a little fettling, as the moulding on the replacement lights where a bit big compared to the OEM cases. However just a quick file on the edges to remove access "Flashing" and job done.
 
<a data-flickr-embed=
49890161416_9d5ba639b9_z.jpg
" />
Decided to have a go at removing a stone chip which is small put right at the top of the bonnet, so I see it all the time. Forgot to take a before photo, small but quite deep. Step One sand surface flat and add some paint.
<a data-flickr-embed=
49890470457_79c3a574ff_z.jpg
" />
Let the paint dry for 3 days, then wet and dried back flat using 800/ 1000/ 2000/ then 8000 grit paper.
<a data-flickr-embed=
49890470447_39951e498e_z.jpg
" />
Started to cut in using cutting compound.
<a data-flickr-embed=
49890160136_0d7d79cc6d_z.jpg
" />
Final mop, not perfect but a lot better than is was. :)
 
Hi, I used generic "wet and dry" paper, and the cutting compound is "Farecla G3" and then to wax "Meguiars Gold. But I have used all sorts in the past, its more about the process and taking your time than the products used, having said that the cutting compound, and elbow grease is the key :)

Marc
 
<a data-flickr-embed=
49904948552_79ddcdc29b_z.jpg
" />
While cleaning I have noticed there are areas which seam to come in contact with road debris more than others. The bottom of the front arch is a little pitted, and when I was looking at purchasing, I had noticed this area takes quite a beating. So I thought I would fit some stone chip protection.
<a data-flickr-embed=
49904948547_e8a483ddff_z.jpg
" />
Making of a simple template using masking tape (after cleaning).
<a data-flickr-embed=
49904975862_a2fe08df1b_z.jpg
" />
Marking out the shape I want. I then carefully removed and trimmed the tape, transferred onto card, and rechecked for fitment. I idea of transferring onto card is so I can check both sides and make left and right hand protectors. After final check, transfer onto some clear stone chip vinyl.
<a data-flickr-embed=
49904649281_acce4a9571_z.jpg
" />
And fitment complete:) Time = 2 hours in total (both sides) Price = Pence, as used some generic roll of stone chip protective film which I had ordered some time before.
Marc :)
 
Thought I would change out the front fog/side lights and indicators to LEDs. No really reason other than I hope they last longer and use less energy to run. I have seen the replacement units which can be purchased and retro fitted, however in my opinion I don't think they suit the car. After completing a little online homework on which bulbs are best, and don't require resistors and other bits and bobs to run I ordered and fitted them yesterday, I can honestly say they make a big difference, much brighter, better quality of light and hopefully I will never have to replace them again (well that's the theory anyway). The job of replacing was so easy and quick I forgot to take pictures :( Will take some later to show the finished result. Just the rear to do now :)

Marc
 
Noticed a rattle while driving, after a little look see found it :)
<a data-flickr-embed=
50337124317_22d859a5cf_z.jpg
" />
My ignition coil cover had tin worm, took 10 minutes to replace, having skinny little arms helped to get to the back bolt :)
<a data-flickr-embed=
50336270313_7d23fc4433_z.jpg
" />
Back to normal
 
Hi guys, Firstly can I say happy new year to you all and hope you had a relaxing Christmas.

After taking Sally out for a little drive today keep her nice and warm, I had a notice on the dash! Engine warning light!! Orange so not major, after getting her back home I plugged in MY ODB2 scanner and read the fault code

P0056
HO2S Heater Control Circuit Bank 2 Sensor 2- Would I be correct in thinking this is the Oxygen sensor past the CAT on bank 2, Eg 456 cylinder which has failed?

Marc
 
Update/
I have tried to remove the Lamda sensor from the top, to no success. I purchased the Lamda removal tool both the off-set and the direct type (extended socket with the split along the side for the wires) Both No good/ don't buy if you need to replace yours, just take the rear bumper off and use a good open ended spanner.
dateposted-public
2kwNQdb
<a data-flickr-embed=
50888103346_fdaff290f8_k.jpg
" />

<a data-flickr-embed=
50887393463_f50a0f670d_k.jpg
" />
After a little wrestling with a good open ended and a rubber mallet / Out it popped:) My only issue, I have now noticed my tandem oil pump has a leaking :(
So New Lamda sensor ordered. But I'm going to give the area a really good clean then try and get the Tandem Pump off while I'm in here. Also my rear lower heat shield needs replacing as it had a massive crack running the length of it.
50888103346_fdaff290f8_k.jpg
[/url]IMG_4589[1] by marc.gough1, on Flickr[/IMG]
<a data-flickr-embed=

 
So this weekend I feel like 'Alice following the rabbit down the hole'. After getting the Lamda sensor off the cat, I thought I would inspect it, as I hadn't payed it much attention after removing it. On closer inspection I noticed that it was threaded :(. I was hoping no damage had taken place to the CAT itself, wishful thinking. I could feel damage with my fingers, and couldn't get the new Lamda sensor to bite. I wondered if I took the CAT off may be I could cut a new thread and all would be good- er no- ALL the Nuts, and I mean all the nuts were so badly corroded that they couldn't be taken off, and needed addressing as they are an issue on there own, I've never seen the like before, rusted and frozen in place.
Access is a real pig and cutting and grinding meant I have damaged the CAT in removing it :( So the best course of action is to replace both CATs for new ones, however the other side is just as bad so will need to tackle that later.
2kxpN6X

<a data-flickr-embed=
50894925177_eeb2d05e81_k.jpg
" />

Mind you I have kept myself busy, cleaning and prepping all the little areas that have over the years lost paint due to rubbing, so that's a bonus, just got to now shop for some New CATs and get the other fella off:).

 
<a data-flickr-embed=
50914620538_5ea0da4e5b_k.jpg
" />
This weekend, decided in for a penny in for a pound. Remove all rotten/ rusty bolts and start fresh. I needed a new Cat, so have purchased the whole lot, back boxes and CATs in stainless steel, to include all new nuts and bolts. Removed the tandem pump as well, which is quite easy once the exhaust is out of the way :). Also grinded back to metal at the bottom edge, then treated and etch primed.
So after filling out a massive order form, I've now got to wait a little before I can start bolting on new shiny stuff :).
 
Hi Marc
I enjoy following your post looks like its a route we will all go on one day. I take it the item sitting on top of hhe air filter is the tandem pump.
Cheers
Steve
 
<a data-flickr-embed=
50918543516_d1795149aa_z.jpg
" />

Thanks for the reply Steve, and yes I guess after reading a lot about the rusty bolts on the 997 exhaust system, it really is a task that needs looking into at some point. The Oil Tandem pump is located at the right hand side at the rear of the engine. The image above shows the pump location after removal, and to save any debris getting in I have used a 'Lint free' cloth to cover the whole until my new one arrives. It can be seen in the image from my earlier post in situ. The oil tandem pump is another job most 997 owners will need to sort out at some point, it's not that the pump fails, mine hasn't, more over that the outer casing rots away and leaks oil :( My casing was/ is rotten but I can't see any leak, however the the garage floor has been dry now for 2 days, so maybe the seals. (But the true test will be once it's all back together and I get the engine running and up to temp).
 
<a data-flickr-embed=
50939481201_3d9e11174e_z.jpg
" /> Nice new stuff

So this weekend, all my new stuff has arrived:) Fitted and run in for a little today, tomorrow colour matching all the touch up areas and then hopefully the rear end and heat shields can go back on.
 
That looks fantastic isn't a shame most of it gets covered up with the bumper
Can you just buy tandem oil covers only as mine is very rusty

Good job

Mike
 

Posts made and opinions expressed are those of the individual forum members

Use of the Forum is subject to the Terms and Conditions

Disclaimer

The opinions expressed on this site are not necessarily those of the Club, who shall have no liability in respect of them or the accuracy of the content. The Club assumes no responsibility for any effects arising from errors or omissions.

Porsche Club Great Britain gives no warranties, guarantees or assurances and makes no representations or recommendations regarding any goods or services advertised on this site. It is the responsibility of visitors to satisfy themselves that goods and/or services supplied by any advertiser are bona fide and in no instance can the Porsche Club Great Britain be held responsible.

When responding to advertisements please ensure that you satisfy yourself of any applicable call charges on numbers not prefixed by usual "landline" STD Codes. Information can be obtained from the operator or the white pages. Before giving out ANY information regarding cars, or any other items for sale, please satisfy yourself that any potential purchaser is bona fide.

Directors of the Board of Porsche Club GB, Club Office Staff, Register Secretaries and Regional Organisers are often requested by Club members to provide information on matters connected with their cars and other matters referred to in the Club Rules. Such information, advice and assistance provided by such persons is given in good faith and is based on the personal experience and knowledge of the individual concerned.

Neither Porsche Club GB, nor any of the aforementioned, shall be under any liability in respect of any such information, advice or assistance given to members. Members are advised to consult qualified specialists for information, advice and assistance on matters connected with their cars at all times.

Back
Top